


The whole guide is on this page and free to read. The PDF has the same text and diagrams, 11 pages, for printing or reading offline.
Download the free PDFYou build a radio receiver that pulls weather images straight from a Russian Meteor satellite and hears packets from the International Space Station, for $47.95 in parts plus a computer you already own. The receiver is an RTL-SDR Blog V4L, a USB software defined radio, with the RTL-SDR Blog dipole kit set up as a V dipole for 137 MHz. On a laptop, the open source SatDump program turns a single pass into a picture of the clouds over your region.
A second stage turns the same radio into an always on station. Add a Raspberry Pi and the SatNOGS client, and your receiver joins the SatNOGS network, where anyone can schedule satellite observations through it and the recordings land in a public archive.
This receiver belongs on theconsciousness.ai because the project’s aerospace pillar asks what it takes to sense and compute in orbit, the hardware a perceiving machine would carry off the planet. Weather satellites are the oldest working example of a spacecraft that observes the Earth and sends the result down to anyone listening. Receiving one teaches the chain every CubeSat project depends on, from orbit prediction and Doppler to antenna pattern, demodulation and decoding.
This guide is the wideband companion to our TinyGS LoRa ground station guide. TinyGS hears one kind of signal on one band; this receiver tunes across the VHF and UHF bands where most CubeSats and weather satellites transmit.
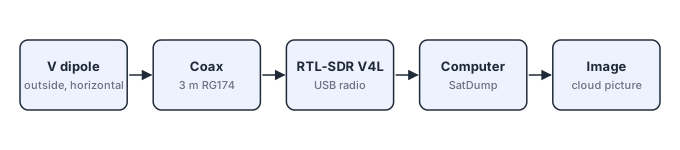
Stage one costs $47.95 for the V4L dongle and dipole kit bundle from RTL-SDR Blog. Stage two adds a Raspberry Pi. Prices below are the makers’ own prices, read on their sites on November 12, 2026, except where marked. Amazon prices are not shown, so check them on Amazon.
| Part | Price | Where to buy | Needed? |
|---|---|---|---|
| RTL-SDR Blog V4L dongle with multipurpose dipole kit | $47.95 at the RTL-SDR Blog store | RTL-SDR Blog store (plain link). Not stocked on Amazon USA yet | Yes |
| V4L dongle alone | $37.95 at the RTL-SDR Blog store | Same (plain link) | If you buy the antenna separately |
| Multipurpose dipole kit alone (two telescopic pairs, 60 cm RG174 base cable, 3 m RG174 extension, tripod, suction mount) | $17.95 at the RTL-SDR Blog store | Same store, or Amazon USA (Amazon, affiliate link) | Yes, unless bundled |
| A computer with a free USB port (Windows, macOS or Linux) | Owned | Yes, stage one | |
| Raspberry Pi 4, 2 GB | $67.50 from October 1, 2026 (report) | Official Raspberry Pi resellers | Stage two |
| Pi power supply, microSD card, Ethernet cable | Not checked | Any | Stage two |
| RTL-SDR Blog Wideband LNA V2 (bias tee powered) | $19.95 at the RTL-SDR Blog store | Same store, or Amazon USA (Amazon, affiliate link) | Later upgrade |
For buyers in Europe, RTL-SDR Blog’s store says it can no longer ship directly to the EU from its webstore and sends EU buyers to its official AliExpress and eBay stores. It also lists V4L stock as limited because of manufacturing delays.
The guide uses the V4L because RTL-SDR Blog ended the V4 because its tuner chip, the R828D, is out of production, and the V4L replaces it with the R828S. Hackster reports that the R828S has two inputs instead of three, so the V4’s extra input filtering is not possible, with the small upside of slightly better sensitivity. The V4L needs updated drivers, and on old ones it shows “no signal”. RTL-SDR Blog says it is working with software makers to support it natively. RTL-SDR Blog V4L page, Hackster report
No soldering in stage one.
The dipole kit becomes a V dipole tuned for 137 MHz, the band Meteor satellites use for images.
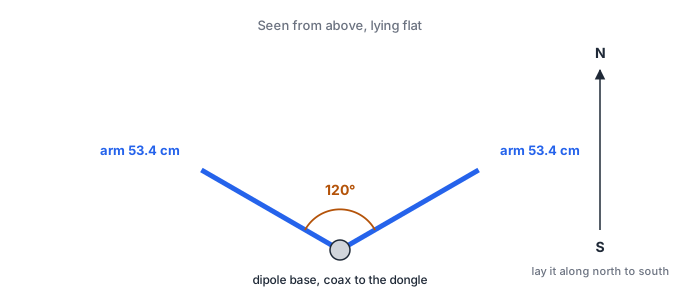
The V lies flat because the satellites send circular polarization, and a horizontal V gives up about 3 dB on them in exchange for cutting vertically polarized ground signals by about 20 dB. Less ground noise means less overload. RTL-SDR Blog dipole guide
For the ISS at 145.825 MHz, shorten each arm a little. The dipole kit guide lists about 42 cm per side for 162 MHz and 60 cm for 115 MHz, so 145 MHz sits between them. Use an online dipole calculator for the exact length.
Steps 3 to 8 follow SDRStore’s SatDump beginner guide (May 2026).
curl -sfL https://satno.gs/install | sh -s --. The satnogs-setup menu comes up during the install.driver=rtlsdr, antenna RX and sample rate 2.048e6.Sources: SatNOGS Setup (edited July 2026), Get Started, Omnidirectional Station How To (2021, for the gain method).
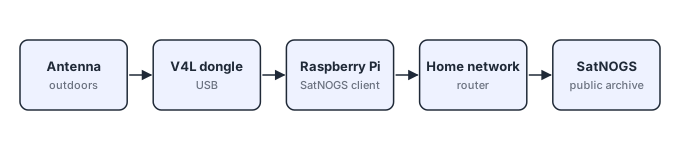
The V dipole is the cheapest antenna that works for weather images. SatNOGS’s own guide warns that a fixed omnidirectional antenna makes CubeSat data difficult to receive, so plan an upgrade if you join the network.
| Antenna | Cost | Best for | Notes |
|---|---|---|---|
| V dipole from the kit | In the $47.95 bundle | Meteor images, ISS APRS | Horizontal, 120 degrees, about 53.4 cm arms for 137 MHz |
| V dipole plus Wideband LNA V2 | $19.95 at the RTL-SDR Blog store | Long cable runs, weak passes | Powered by the dongle’s bias tee; SatNOGS warns an LNA can overload the radio |
| Turnstile or quadrifilar helix (QFH) | DIY or bought | A permanent SatNOGS station | Circular polarization; the SatNOGS antenna page lists designs |
| RTL-SDR Blog L band patch set | $59.95 at the RTL-SDR Blog store | Inmarsat and Iridium at 1.5 to 1.6 GHz | Amazon USA (Amazon, affiliate link); a later step |
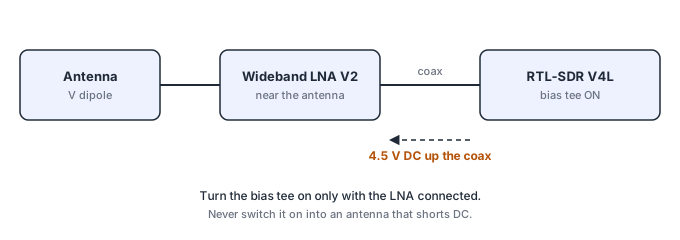
Watch the bias tee. The V4L’s bias tee supplies 4.5 V. RTL-SDR Blog warns against switching it on into an antenna that shorts DC unless an LNA sits between them. Turn it on only with the LNA connected. Source
Start with what is on the air in November 2026. Most older tutorials built around NOAA 15, 18 and 19 no longer apply. NOAA-18 was shut down in June 2025, and NOAA-15 and NOAA-19 were scheduled for shutdown in August 2025. Source
| Target | Frequency | What you get | Notes |
|---|---|---|---|
| Meteor-M N2-4 | LRPT near 137.1 or 137.9 MHz | Cloud images of your region | SatNOGS lists it as operational with 72k and 80k LRPT modes; check the current mode before a pass. SatNOGS DB |
| ISS APRS digipeater | 145.825 MHz FM | Short data bursts relayed by the station | AMSAT calls it the most common ISS mode |
| ISS SSTV events | 145.800 MHz FM | Pictures sent from orbit | Occasional |
| ISS voice repeater | 437.800 MHz FM downlink | Voice from licensed operators | Listen only |
ISS frequencies come from AMSAT.
Here is a first Meteor pass, step by step.
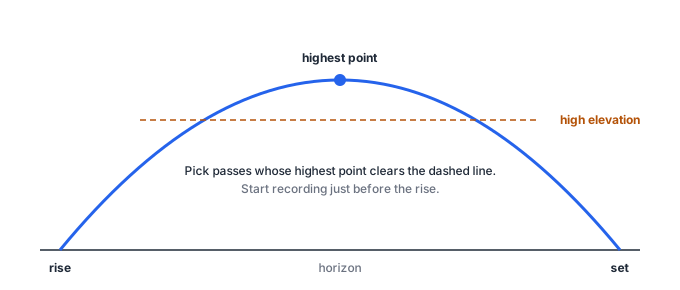
Keep a log of the time, elevation, gain and result of every pass. It is the start of a dataset about your own station.
| Symptom | Likely cause | Fix |
|---|---|---|
| Dongle detected, no signal at all | Old drivers; the V4L needs the updated library | Install RTL-SDR Blog’s current drivers |
| SatDump cannot find the device (Windows) | USB driver not set | SDRStore’s guide uses Zadig with WinUSB on “Bulk-In Interface 0”; pick the device carefully, Zadig can overwrite other USB drivers |
| Device busy | Another SDR program has it open | Close SDR++, SDR# or CubicSDR before decoding |
| Waterfall bright and noisy everywhere | Gain too high | Lower the gain |
| Signal visible, no image | Wrong pipeline, mode or sample rate | Match the pipeline to the satellite’s current mode |
| Image has gaps | Signal dropped during the pass | Higher passes, higher antenna, shorter cable |
| Nothing on Meteor’s frequency | Wrong time or a low pass | Update orbital data; check the pass prediction and your location |
| SatNOGS error “soapysdr::device::make() no match” | Library too old for the dongle | Update librtlsdr; a 2024 SatNOGS forum thread fixed a V4 this way |
| Local noise ruins observations | LED bulbs, USB chargers, monitors, HDMI or DVI cables, Ethernet near the antenna | Switch them off one at a time during a pass to find the source |
Sources: SatDump beginner guide, RTL-SDR Blog V4L guide, SatNOGS forum thread, Omnidirectional Station How To.
| Source | Date | License | What we used |
|---|---|---|---|
| RTL-SDR Blog V4L page | 2025 to 2026 | None stated | Why the V4L exists, driver needs, bias tee warning |
| RTL-SDR Blog store page | Nov 12, 2026 | Not applicable | Prices, stock, EU shipping |
| Hackster report | See article | Not applicable | R828D and R828S tuner change |
| RTL-SDR Blog driver library | March 2026 | GPL-2.0 | Date V4L support was added |
| RTL-SDR Blog dipole kit guide | 2018, updated | None stated | V dipole lengths, angle and orientation for 137 MHz |
| SDRStore SatDump beginner guide | May 30, 2026 | None stated | Install order, Windows driver, troubleshooting list |
| SatNOGS wiki | Ongoing | CC BY-SA 3.0 | Client install, antenna advice, noise hunting (paraphrased only) |
| SatDump on GitHub | Ongoing | GPL-3.0 | Pipelines, release dates and Windows build scripts |
| AMSAT ISS page | Ongoing | None stated | ISS frequencies |
| SatNOGS forum thread | 2024 | Forum post | V4 library fix |
Video tutorials were not reviewed for this guide.
Every diagram in this guide was drawn for it by theconsciousness.ai. The guide uses no photos or screenshots from RTL-SDR Blog, SatNOGS, SatDump or any other site.
The TinyGS ground station guide is the companion build, a $20 LoRa station that logs CubeSat packets on the TinyGS world map. Both guides come as one PDF for printing. Every satellite kit, with sellers and prices, is on the hardware kits page, and the consciousness to orbit page explains why this project studies computing in orbit.
Take the guide offline, 11 pages with every diagram and source.
Download the free PDF