


The whole guide is on this page and free to read. The PDF has the same text and diagrams, 11 pages, for printing or reading offline.
Download the free PDFYou build a receiving station that hears small satellites as they pass over your house, from about $20 in parts. A Heltec WiFi LoRa 32 V3 board listens on 433 MHz, a better antenna replaces the small one in the box, and the open TinyGS network collects what you hear and puts your station on a world map beside every other volunteer receiver.
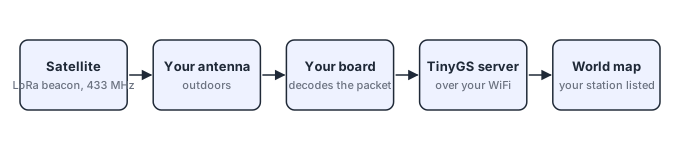
The board does one job. When a CubeSat or a pico satellite flies within range, its LoRa beacon reaches your antenna, the board decodes the packet, and TinyGS logs it with your station’s name. The radio only listens. Transmit stays off unless you hold an amateur license.
This station belongs on theconsciousness.ai because the project’s aerospace pillar asks what it takes to run computation and sensing in orbit, the kind of hardware a machine that perceives its surroundings would one day carry. Before anyone flies a payload, they need to hear one. This station is a cheap way to receive real telemetry from real spacecraft, and a first step toward listening to a satellite of your own.
Budget one evening for the build and setup, then let it run while satellites come over.
The minimum station is the board plus a USB C cable, about $20 before shipping. The recommended station adds an outdoor 433 MHz antenna. Prices below were read on the sellers’ pages on November 12, 2026. Prices change, so check them before you buy.
| Part | Price | Where to buy | Needed? |
|---|---|---|---|
| Heltec WiFi LoRa 32 V3, 433 MHz band | $17.90 to $19.90 plus shipping | Heltec’s own store (plain link) | Yes |
| Same board, EU seller (listing includes an IPEX to SMA pigtail) | €39.90, in stock by backorder | Pileup Communications, Sweden (plain link) | Alternative for Europe |
| Same board, EU seller (listing includes an IPEX to SMA pigtail) | €22.75, out of stock (2 to 4 weeks) | TinyTronics, Netherlands (plain link) | Alternative for Europe |
| IPEX (U.FL) to SMA female pigtail | a few dollars | Any electronics seller | Needed for an outdoor antenna if your box has none |
| USB C data cable | a few dollars, or one you own | Any | Yes (not in the box) |
| HYS 433 MHz omni antenna | check the listing | Linked from the TinyGS parts list (plain link) | Recommended |
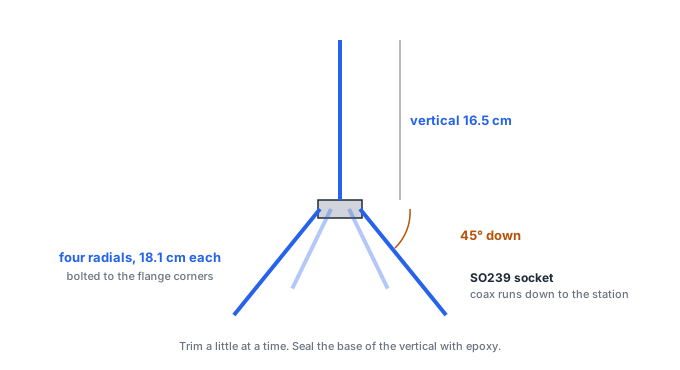
| DIY quarter wave ground plane (1 m of 12 or 14 AWG copper wire, SO239 panel connector with PTFE insulation, four M3 bolts) | a few dollars in parts | Hardware store | Alternative to the HYS antenna |
| SMA to UHF (PL259) adapter cable, only for the DIY antenna or a Diamond X30A | check the listing | Linked from the TinyGS parts list (plain link) | Only with a UHF antenna |
Heltec’s own listing names the board, a LoRa antenna, a battery connector and two pin headers. It names no pigtail, while the two European sellers above list one. Check what your box holds before you plan the outdoor antenna.
Buy the 433 MHz version of the board, and confirm the listing you buy from says 433 MHz, because Heltec’s own page is not consistent about the band options. TinyGS says more than 90% of active LoRa satellites on its network use the 437 and 400 MHz bands, and a board matched to 868 or 915 MHz will run the firmware but hear little from orbit. Source
TinyGS names the Heltec V3 as its recommended board, ahead of LilyGO boards, because its radio has a temperature compensated crystal (TCXO) that holds frequency. Its April 2026 newsletter says LilyGO T3 boards can have frequency stability issues, and reports one member whose daily packet count rose from about 400 to about 700 after swapping a LilyGO T3 v1.6 for a Heltec board on the same antenna. Newsletter
Heltec has since released a V4 board. We found no TinyGS note confirming V4 support as of November 12, 2026, so this guide sticks with the V3.
The board build needs no soldering. The pin headers in the box stay in the bag.
The board’s LoRa antenna socket is a tiny IPEX (U.FL) snap connector, and it is the one fragile part of the build.
Once setup is done, the station runs from USB power around the clock.
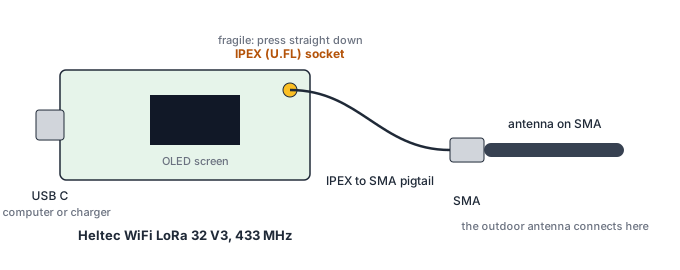
Three pieces have to line up, a TinyGS account, firmware on the board and the station’s settings. Do them in that order.
Since TinyGS’s Christmas 2025 release, it accepts sign ups by email invite, with no Telegram needed. Ask an active member for an invite, or (schools and workshops) write to the address on the join tutorial. The Telegram route still works. Join the TinyGS group, open a private chat with @tinygs_personal_bot, and send /mqtt for the MQTT user and password your station needs. Send /weblogin to the same bot for a login link to the web console.
TinyGS calls the installer experimental. If it fails, the fallback is PlatformIO, covered on the TinyGS wiki.
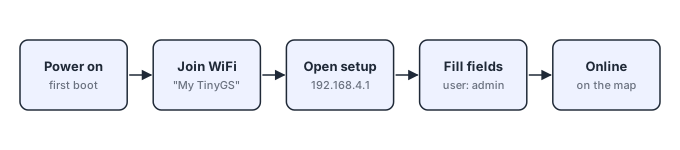
On first boot the board opens a WiFi network named “My TinyGS”. Join it from your phone or laptop; the setup page should open by itself, and if it does not, browse to 192.168.4.1. The user name is always admin.
| Field | What to enter |
|---|---|
| Groundstation name | A unique name; it shows on the world map |
| Groundstation password | Your own password for this panel; write it down |
| SSID and password | Your home WiFi |
| Time zone | Yours |
| Latitude and longitude | Your station’s position |
| MQTT server and port | Leave the defaults |
| MQTT user and pass | The pair from your account or the bot |
| Board type | Usually detected; set Heltec V3 by hand only if the radio does not start |
| OLED bright | Below 100, to make the screen last |
| Enable TX | Leave off unless you hold an amateur license |
| Automatic tuning | On, so the station follows the next satellite (TinyGS marks it experimental) |
| Test mode | Off for real reception |
| Automatic firmware update | On, as TinyGS recommends |
Save. The board joins your WiFi, connects to the TinyGS server and starts listening. Source
The antenna decides how many packets you catch. The TinyGS wiki says the small antenna in the box “most likely will not give any result” for satellites, though its FAQ notes such antennas have caught distant packets in good conditions. Treat it as a bench test and move to one of these.
| Antenna | Cost | Effort | Connector | Notes |
|---|---|---|---|---|
| Small antenna from the box | Included | None | Check your box | Bench test only |
| HYS 433 MHz omni | Check the listing | Mount and route cable | Check the listing | Recommended start; TinyGS calls it a strong price to performance balance and pairs it with an SMA extension cable |
| DIY quarter wave ground plane | A few dollars | One hour with a soldering iron | SO239 | Best learning project; needs an SMA to UHF cable |
| Diamond X30A | Higher budget | Mast mount | UHF | TinyGS says it gives better horizon coverage; needs an SMA to UHF cable |
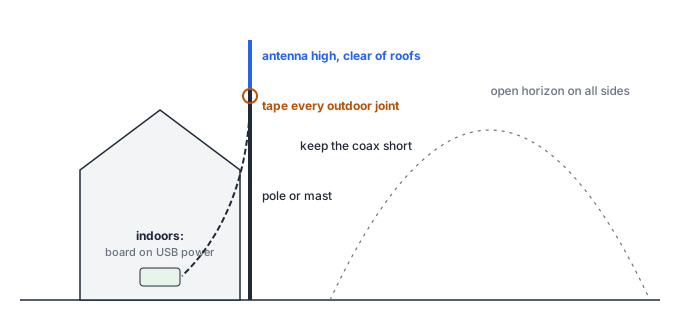
Put the antenna high and clear, with as much open horizon as you can get, on a pole, mast or balcony rail. Keep the coax run short, and wrap every outdoor connector joint tightly in mastic or self amalgamating tape.
Later, an LNA (low noise amplifier) can lift weak signals. One contributor’s tests on the TinyGS wiki found that a filter is a must alongside it, that a 60 dB amplifier gave no advantage, and that an LNA powered by a bias tee killed a LoRa chip over weeks, so add a DC blocker. Get the plain station working first. Source
Your first packet arrives when a LoRa satellite passes within range and your antenna can see it. Low orbit passes are short, so the station has to be listening at the right minutes; leave it running.
/weblogin or your email account. Find your station by name and check it shows as online.Two things look like failures and are not. A CRC error means a packet arrived with damaged bytes; it still shows the station is hearing something. Packets marked Unknown are usually ground LoRa traffic that shares the band, not satellites. Source
Write down the date, the satellite and your antenna for the first packet. Change one thing at a time after that (antenna height, cable, position) and compare packet counts over a week. That is the first real experiment this station gives you.
| Symptom | Likely cause | Fix |
|---|---|---|
| Installer finds no board | Charging only USB cable, or a browser other than Chrome or Edge | Swap the cable; use Chrome or Edge |
| Installer fails partway | The installer is experimental | Retry, then flash with PlatformIO from the TinyGS wiki |
| No “My TinyGS” network | Firmware not running yet, or the board already joined your WiFi | Reflash; or find the board’s address on your router and open it there |
| Setup page does not open | Phone did not trigger the captive page | Browse to 192.168.4.1 while joined to “My TinyGS” |
| Lost the panel password | Hold the PRG button for 8 seconds for rescue mode (an open setup network named after your station), or send the letter e over serial at 115200 baud to reset to defaults | |
| Console shows MQTT “failed, rc=-2” | A firewall or ad blocker (Pi hole, for example) blocks the TinyGS server | Add an exception for it |
| Radio does not start | Board type not detected | Set the board type by hand in the panel |
| Station stays on Norby | No compatible satellite overhead yet | Wait; check automatic tuning settings in the console |
| Online for days, no packets | Small antenna from the box, indoor position, or a board for the wrong band | Fit an outdoor antenna; confirm the board is the 433 MHz version |
| OLED flips between light and dark | Intended, to slow screen wear | Leave it |
Sources: TinyGS FAQ, Quick Start. For anything else, the TinyGS Telegram group is where the volunteers who run the network answer.
TinyGS is a non profit organization run entirely by volunteers. It started on November 28, 2019 as the ESP32 OLED Fossa GroundStation and took the TinyGS name when tinyGS.com launched on February 14, 2021. Its station software is licensed under GPL 3.0. This guide contains none of that code; it sends you to TinyGS’s own installer and wiki. If the network helps you, you can support it through the donation page on tinygs.com.
This guide is independent and written by theconsciousness.ai. It is not made, endorsed or reviewed by TinyGS or Heltec Automation.
The guide is free, and every link in it is a plain link that earns nothing.
| Source | Date | License | What we used |
|---|---|---|---|
| TinyGS wiki | Ongoing | None stated for text; software is GPL-3.0 | Flashing, configuration fields, LNA tests, rescue mode |
| TinyGS parts list tutorial | May 31, 2026 | None stated | Parts, antennas and cables |
| TinyGS join tutorial | June 3, 2026 | None stated | Email invite signup and the Telegram bot |
| TinyGS ground plane tutorial | Undated | None stated | Ground plane dimensions |
| TinyGS newsletter | Apr 19, 2026 | None stated | Heltec V3 as the recommended board, LilyGO frequency stability |
| TinyGS FAQ | Ongoing | None stated | Troubleshooting |
| TinyGS repository on GitHub | Ongoing | GPL-3.0 | Board support list, project history |
| Heltec, Pileup and TinyTronics listings | Nov 12, 2026 | Not applicable | Prices and box contents |
All wording above is ours; no TinyGS text is copied. Video tutorials were not reviewed for this guide.
Every diagram in this guide was drawn for it by theconsciousness.ai. The guide uses no photos or screenshots from TinyGS, Heltec or any other site.
The RTL-SDR satellite receiver guide is the companion build, a wideband receiver that decodes Meteor weather images and joins SatNOGS. Both guides come as one PDF for printing. Every satellite kit, with sellers and prices, is on the hardware kits page, and the consciousness to orbit page explains why this project studies computing in orbit.
Take the guide offline, 11 pages with every diagram and source.
Download the free PDF